
Looking for a quick and tasty snack? You’ve found it! These Bisquick sausage balls are super easy to make and perfect for any occasion. With just a few simple ingredients like breakfast sausage, Bisquick mix, and cheese, you can whip up these savory bites in no time. Let’s get cooking and delight your friends and family with this fun snack!
Why I Love This Recipe
- Quick and Easy: This recipe comes together in just 15 minutes of prep time, making it perfect for a last-minute snack or party appetizer.
- Versatile Flavor: With options for mild or spicy sausage and the addition of green onions, you can customize the flavor to suit your taste.
- Cheesy Goodness: The generous amount of shredded cheese not only adds flavor but also creates a delightful texture that everyone loves.
- Perfect for Any Occasion: These sausage balls are great for game day, holiday parties, or even as a quick breakfast on the go!
Ingredients
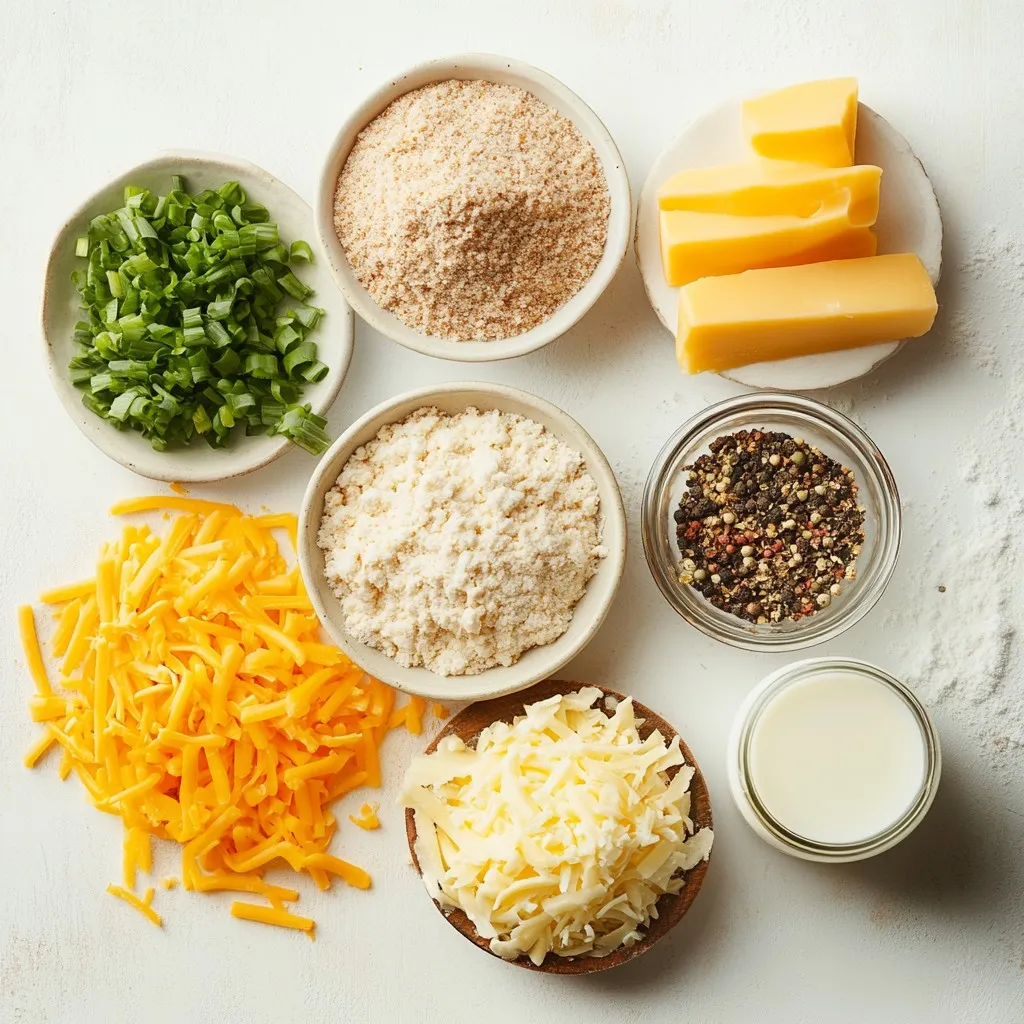
Required Ingredients
– 1 lb breakfast sausage (mild or spicy)
– 2 cups Bisquick mix
– 2 cups shredded cheese (cheddar or a blend)
Optional Ingredients
– 1/4 cup minced green onions
– Spices: garlic powder, onion powder, black pepper, cayenne pepper
Equipment Needed
– Mixing bowl
– Baking sheet
– Parchment paper
To make Bisquick sausage balls, you need some simple ingredients. First, pick your sausage. You can use mild or spicy breakfast sausage. Next, you need two cups of Bisquick mix. This mix helps bind everything together. Then, grab two cups of shredded cheese. Cheddar is a classic choice, but feel free to use a mix for extra flavor.
You can also add some optional ingredients. Minced green onions give a fresh taste. Spices like garlic powder, onion powder, black pepper, and cayenne pepper add depth. You can choose how spicy you want your sausage balls.
For equipment, you need a mixing bowl to combine everything. A baking sheet helps cook the balls evenly. Parchment paper makes cleanup easy and prevents sticking. With these ingredients and tools, you are ready to create a tasty snack.
Step-by-Step Instructions
Prepping the Oven and Baking Sheet
– Preheat your oven to 375°F (190°C). This ensures even cooking.
– Prepare your baking sheet by lining it with parchment paper. This helps with easy cleanup.
Mixing Ingredients
– In a large mixing bowl, combine the sausage, Bisquick, cheese, and spices.
– Use your hands to mix everything well.
– Gradually add the milk to the mixture. Keep mixing until a dough forms. It should feel moist but not sticky.
Shaping and Baking
– Take small amounts of the dough and roll them into balls. Aim for about 1 inch in diameter.
– Place the balls on the prepared baking sheet. Leave some space between each one.
– Bake in the preheated oven for 18-20 minutes. Look for a golden brown color to know they’re done. The sausage balls should reach an internal temperature of 160°F (71°C).
Tips & Tricks
Achieving the Perfect Texture
To get the right texture, moisture matters. Your dough should feel slightly moist but not sticky. If it is too dry, add a splash more milk. When the sausage balls bake, they should rise and become fluffy.
To know if they are done, check the color. They should be golden brown. Use a meat thermometer to check the inside. It should read 160°F (71°C). If it is not there yet, bake for a few more minutes.
Flavor Enhancements
Looking to jazz up your Bisquick sausage balls? Add spices! Consider mixing in some Italian herbs or smoked paprika for a twist. If you love heat, increase the cayenne pepper or add hot sauce to the mix.
You can also swap out cheddar for pepper jack cheese. This will add a nice kick without much work. Just remember, balance the flavors so one spice does not overpower the others.
Presentation Ideas
To make your sausage balls shine, serve them with dips. Spicy mustard or ranch dressing makes a great pair. You can also offer a sweet dipping sauce for a fun twist.
For garnishing, sprinkle fresh parsley on top before serving. This adds color and makes the dish look fancy. Arrange the balls on a nice platter to catch the eye. Guests will love the presentation as much as the taste!
Pro Tips
- Choose Your Sausage Wisely: Select a breakfast sausage that suits your taste preference; mild sausage is great for a family-friendly option, while spicy sausage adds a kick for those who enjoy heat.
- Cheese Variations: Experiment with different types of cheese, such as pepper jack for added flavor or mozzarella for a gooey texture.
- Rolling Tips: To make rolling easier, wet your hands slightly to prevent the dough from sticking to your fingers.
- Freezing for Later: These sausage balls freeze well! Prepare a batch, let them cool, and freeze in a single layer. Reheat in the oven when ready to serve.
Variations
Cheese Options
You can change up the cheese in your Bisquick sausage balls for fun flavors. Pepper jack adds a nice kick. Mozzarella gives a good stretch and mild taste. If you want a dairy-free option, try vegan cheese. Many brands make great substitutes. Just make sure it melts well.
Sausage Alternatives
If you want a lighter option, consider turkey or chicken sausage. They still pack a lot of flavor. For a plant-based choice, look for vegan sausage. These options keep your snack tasty but lighter. You won’t lose any of the deliciousness.
Flavor Profile Variations
Adding herbs or spices can take your sausage balls to the next level. Try Italian seasoning for a warm flavor. Fresh herbs like parsley or chives also work well. You can use different types of onions, too. Green onions add a nice crunch. Mixing in other vegetables, like bell peppers, gives more texture and taste. Feel free to get creative!
Storage Info
Storing Leftovers
To store your Bisquick sausage balls in the refrigerator, place them in an airtight container. They will stay fresh for up to three days. If you want to keep them longer, freeze the sausage balls. Arrange them on a baking sheet in a single layer. Once frozen, transfer them to a freezer-safe bag. They will last for about two months in the freezer.
Reheating Instructions
For best results, use the oven to reheat your sausage balls. Preheat the oven to 350°F (175°C). Place the sausage balls on a baking sheet and heat for about 10-15 minutes. This method keeps them crispy. If you’re in a hurry, use the microwave. Heat them for about 30 seconds to one minute. The microwave is faster but may make them a bit soft.
Shelf Life
When stored properly, your Bisquick sausage balls will stay fresh in the fridge for three days. In the freezer, they will remain safe and tasty for about two months. Always check for any off smells or colors before eating. If in doubt, throw it out!
FAQs
How do I know when Bisquick sausage balls are done?
You can tell when your sausage balls are ready by checking two key things. First, look for a golden-brown color on the outside. This shows they are cooking well. Second, use a meat thermometer to check the internal temperature. It should reach 160°F (71°C). This ensures the sausage is safe to eat.
Can I make Bisquick sausage balls ahead of time?
Yes, you can prepare sausage balls ahead of time! You can mix the dough and shape the balls. Then, place them on a baking sheet and freeze them. Once frozen, transfer them to a freezer bag. When you want to cook them, bake from frozen. Just add a few extra minutes to the cooking time.
What can I serve with sausage balls?
Sausage balls pair great with several dips. Consider serving them with spicy mustard or ranch dressing. These dips add flavor and make each bite even better. You can also add fresh parsley on the platter for a nice touch. It makes the dish look vibrant and inviting.
In this post, we covered how to make tasty Bisquick sausage balls. We looked at key ingredients, including breakfast sausage, Bisquick, and cheese, along with optional flavors. You learned step-by-step instructions for mixing, shaping, and baking. I shared tips for texture, flavor boosts, and presentation ideas. We also explored variations, storage tips, and answered common questions. Enjoy making these delicious snacks for your next gathering or meal. They are sure to impres