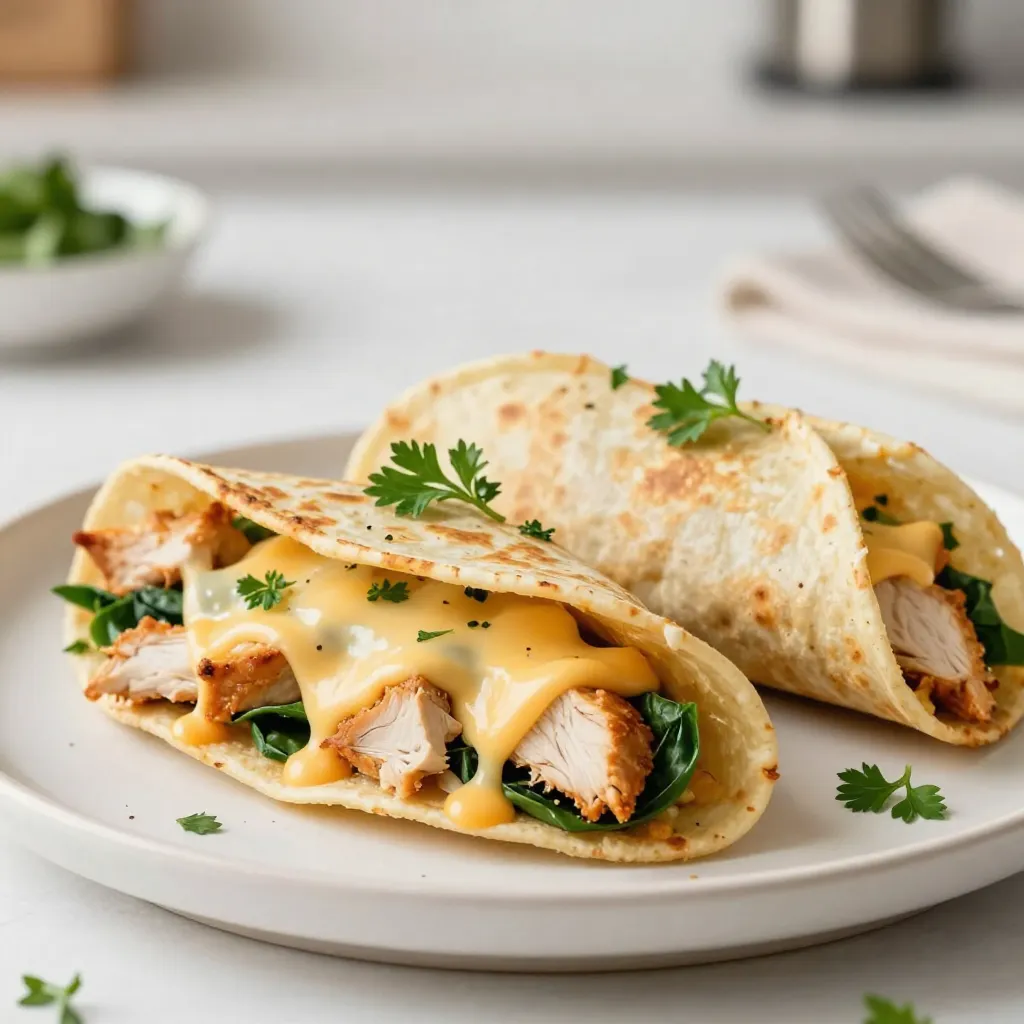
Craving a quick, tasty meal? You’ll love my Cheesy Garlic Chicken Wraps! They are easy to make and bursting with flavor. In this guide, I’ll share the best ingredients, tools, and tips to create this savory dish. Get ready to impress yourself (and your friends) with a wrap that everyone will devour. Let’s dive right into the cheesy goodness!
Why I Love This Recipe
- Deliciously Cheesy: The creamy combination of mozzarella and cream cheese creates a rich and satisfying flavor that makes these wraps irresistibly tasty.
- Quick and Easy: This recipe comes together in just 30 minutes, making it perfect for busy weeknights or a quick lunch option.
- Versatile Filling: You can easily customize the filling with your favorite veggies or proteins, ensuring that it suits your taste preferences.
- Perfectly Crispy: Cooking the wraps in the skillet gives them a delightful crunch that contrasts beautifully with the cheesy filling.
Ingredients
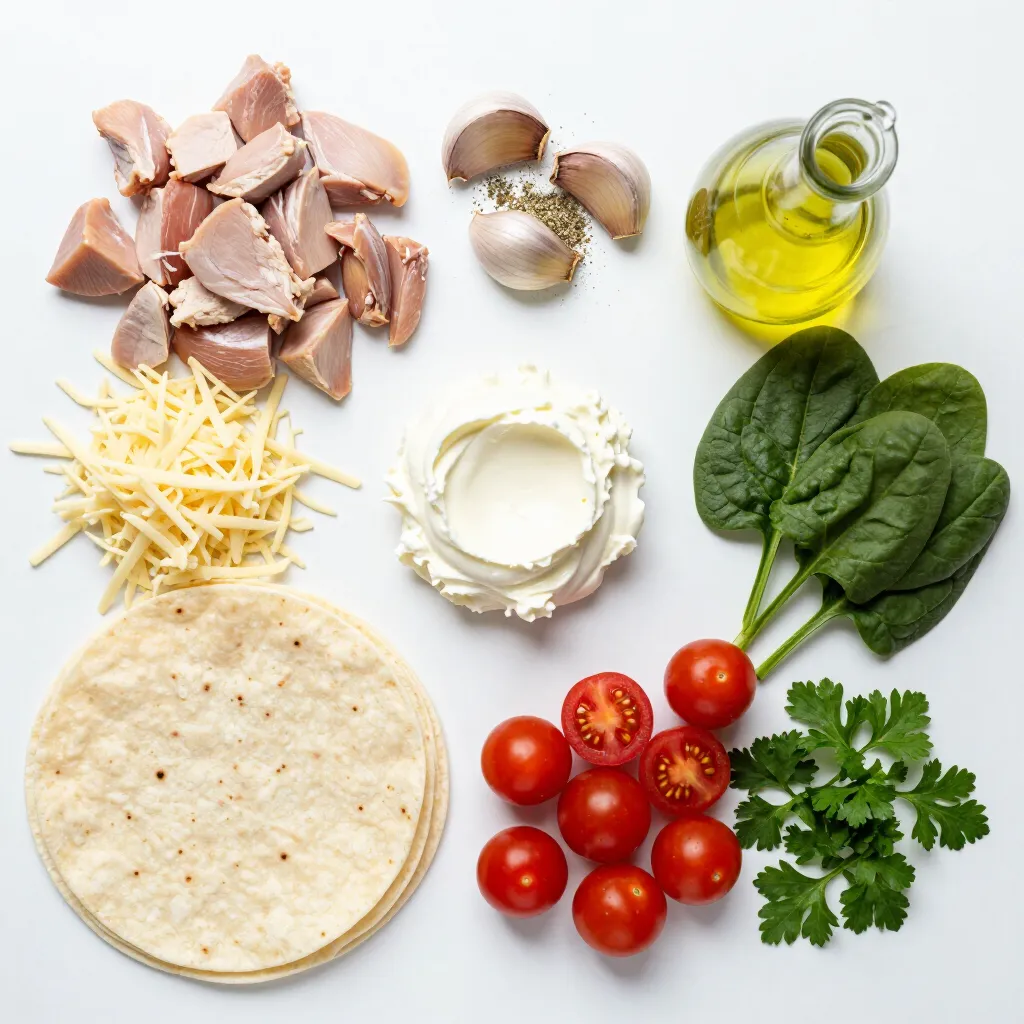
List of Required Ingredients
To make Cheesy Garlic Chicken Wraps, you’ll need:
– 2 large chicken breasts, diced
– 1 cup shredded mozzarella cheese
– 1/2 cup cream cheese, softened
– 3 cloves garlic, minced
– 1 teaspoon Italian seasoning
– 1 tablespoon olive oil
– Salt and pepper to taste
– 4 large tortillas (flour or whole wheat)
– 1 cup spinach leaves
– 1/2 cup chopped cherry tomatoes (optional)
– 1/4 cup fresh parsley, chopped (for garnish)
Kitchen Tools Needed
To prepare these wraps, gather the following tools:
– Skillet
– Spatula
– Mixing bowl
– Knife
– Cutting board
– Measuring cups and spoons
Tips for Ingredient Substitutions
If you don’t have an item, here are some swaps:
– Use chicken thighs instead of breasts for a juicier bite.
– Swap mozzarella with cheddar for a sharper taste.
– If you lack cream cheese, try ricotta or Greek yogurt.
– For a dairy-free option, use vegan cheese and non-dairy cream cheese.
– Skip the spinach and add any leafy greens you prefer, like arugula or kale.
– Use any tortilla type, such as corn or spinach, for different flavors.
These tips help you make Cheesy Garlic Chicken Wraps even if you’re missing an ingredient. Get creative!
Step-by-Step Instructions
Cooking the Chicken
First, you need to heat the olive oil in a skillet over medium heat. Then, add the diced chicken. Season it with salt, pepper, and Italian seasoning. Cook this for about 7 to 10 minutes. Stir often until the chicken turns golden brown and is fully cooked. After that, add the minced garlic. Cook it for just one more minute until it smells nice. Once done, take the skillet off the heat and let the chicken cool a bit.
Preparing the Cheesy Mixture
While the chicken cools, grab a bowl. In this bowl, mix the softened cream cheese and shredded mozzarella. Stir well until they blend smoothly. This cheesy mix will create a rich taste in your wraps.
Assembling the Wraps
Now, lay a tortilla flat on a clean surface. Spread some of the cheesy mixture in the center of the tortilla. Next, add some of the cooked chicken on top. Then, layer on the fresh spinach and chopped cherry tomatoes if you want. The colors make your wrap look nice! Fold the sides of the tortilla over the filling. Finally, roll it tightly from the bottom to the top.
Cooking the Wraps to Perfection
Take the filled wraps and place them seam side down in the same skillet. Cook them on medium heat for 2 to 3 minutes on each side. You want the tortillas to turn golden brown and crispy. Once they are done, remove them from the skillet. Let them sit for a minute before cutting them in half. You can garnish the wraps with chopped parsley for a fresh look. Serve them warm and enjoy!
Tips & Tricks
Best Practices for Homemade Wraps
To make great wraps, you need good tortillas. Flour or whole wheat work well. Choose large ones; they hold more filling. Keep your fillings fresh and colorful. I love adding spinach and tomatoes for crunch and color. Spread the cheesy mix evenly. This helps every bite taste great. Don’t overfill your wraps. This makes them hard to roll.
How to Achieve Maximum Crispiness
For crispy wraps, use medium heat. This ensures the outside gets golden while the inside stays warm. Use a bit of oil in the skillet. It helps crisp the tortillas. Flip the wraps carefully so they don’t fall apart. Let them sit for a minute after cooking. This helps them firm up and makes it easier to slice.
Common Mistakes to Avoid
One common mistake is not seasoning the chicken enough. Salt and pepper are key to good flavor. Don’t skip the garlic; it adds great taste. Another mistake is overcooking the chicken. It should be golden brown, not dry. Finally, avoid using cold ingredients. Let the cream cheese soften before mixing. This helps it blend better with the cheese.
Pro Tips
- Use Leftover Chicken: If you have leftover chicken from a previous meal, this is a great way to utilize it and save time on cooking.
- Customize Your Fillings: Feel free to add other vegetables like bell peppers or mushrooms for extra flavor and nutrition.
- Serving Suggestions: Serve with a side of marinara sauce or ranch dressing for dipping to enhance the flavors of the wraps.
- Make It Ahead: These wraps can be assembled ahead of time and stored in the refrigerator for a quick meal option later in the week.
Variations
Alternative Proteins
You can switch up the chicken for other meats. Try diced turkey or pork. These options work well with the cheesy mix. If you like beef, use ground beef or steak strips. Just make sure to cook them fully.
Vegetarian Option Ideas
For a meatless wrap, use hearty veggies. Start with mushrooms or bell peppers. You can also add black beans for protein. Mix in some zucchini or eggplant for extra texture. These options keep it filling and flavorful.
Flavor Enhancements and Add-ins
Enhance the flavor with spices and herbs. Try adding red pepper flakes for heat. A splash of lemon juice brightens the dish. You can also mix in sautéed onions or jalapeños. For a smoky taste, add some chipotle sauce. Each of these ideas makes the wraps unique and fun.
Storage Info
How to Store Leftovers
To store your cheesy garlic chicken wraps, first let them cool. Place the wraps in an airtight container. You can keep them in the fridge for up to three days. If you want to enjoy them later, wrap them tightly in plastic wrap before placing them in the container.
Reheating Instructions
To reheat your wraps, you can use a skillet. Heat it over medium heat. Place the wraps in the skillet for about 3-4 minutes on each side. This keeps them crispy. You can also use the microwave. Just heat for about 1-2 minutes, but the wraps may not be as crispy.
Freezing Tips for Meal Prep
If you want to freeze your wraps, first let them cool completely. Then, wrap each one tightly in plastic wrap. Place them in a freezer bag, and you can freeze them for up to three months. When you’re ready to eat, thaw them in the fridge overnight. Then, reheat using the skillet or microwave. This way, you always have a tasty meal ready.
FAQs
What can I use instead of cream cheese?
You can replace cream cheese with sour cream or Greek yogurt. Both give a nice tang. Cream cheese adds creaminess, so choose a substitute with a similar texture. You might also try cottage cheese blended until smooth for a lighter option.
Can I make these wraps in advance?
Yes, you can make these wraps ahead of time. Just prepare the wraps, then store them in the fridge. To keep them fresh, wrap each one in plastic wrap. They are best eaten within two days. You can also freeze them for longer storage.
What sides pair well with cheesy garlic chicken wraps?
These wraps go great with a fresh salad or steamed veggies. You might also serve them with crispy potato wedges or sweet potato fries. For a light option, try a fruit salad or a simple yogurt dip.
How do I ensure the chicken is cooked properly?
To ensure your chicken is cooked well, use a meat thermometer. The internal temperature should reach 165°F. Cook the chicken until it’s golden brown and no longer pink inside. Cut into a piece to check if it’s done.
This blog post covered the key elements to make tasty cheesy garlic chicken wraps. We discussed the ingredients, kitchen tools, and tips for swaps. You learned step-by-step instructions, including cooking chicken and achieving perfect wraps. We also shared tips for best practices and avoiding mistakes. Lastly, we explored variations, storage methods, and addressed common FAQs.
Try these wraps for a fun meal. You’ll enjoy making them as much as eating the