Craving a sweet treat that feels like a winter wonderland? Let me introduce you to my Cherries in the Snow dessert. This creamy delight combines luscious cherries with fluffy whipped cream for a crowd-pleaser that is easy to make. In this post, I’ll guide you through every step, from choosing ingredients to tips for perfecting your layers. Get ready to impress your family and friends with this festive dessert!
Why I Love This Recipe
- Fresh and Fruity: This dessert showcases the natural sweetness and tartness of cherries, making it a delightful treat for fruit lovers.
- Light and Creamy: The whipped cream adds a luxurious texture, balancing the cherries’ acidity perfectly.
- Quick to Assemble: With minimal cooking and easy layering, this dessert comes together quickly, perfect for any occasion.
- Stunning Presentation: Layering the cherries and cream in clear glasses not only looks beautiful but also invites guests to dig in!
Ingredients
Main Ingredients for Cherries in the Snow Dessert
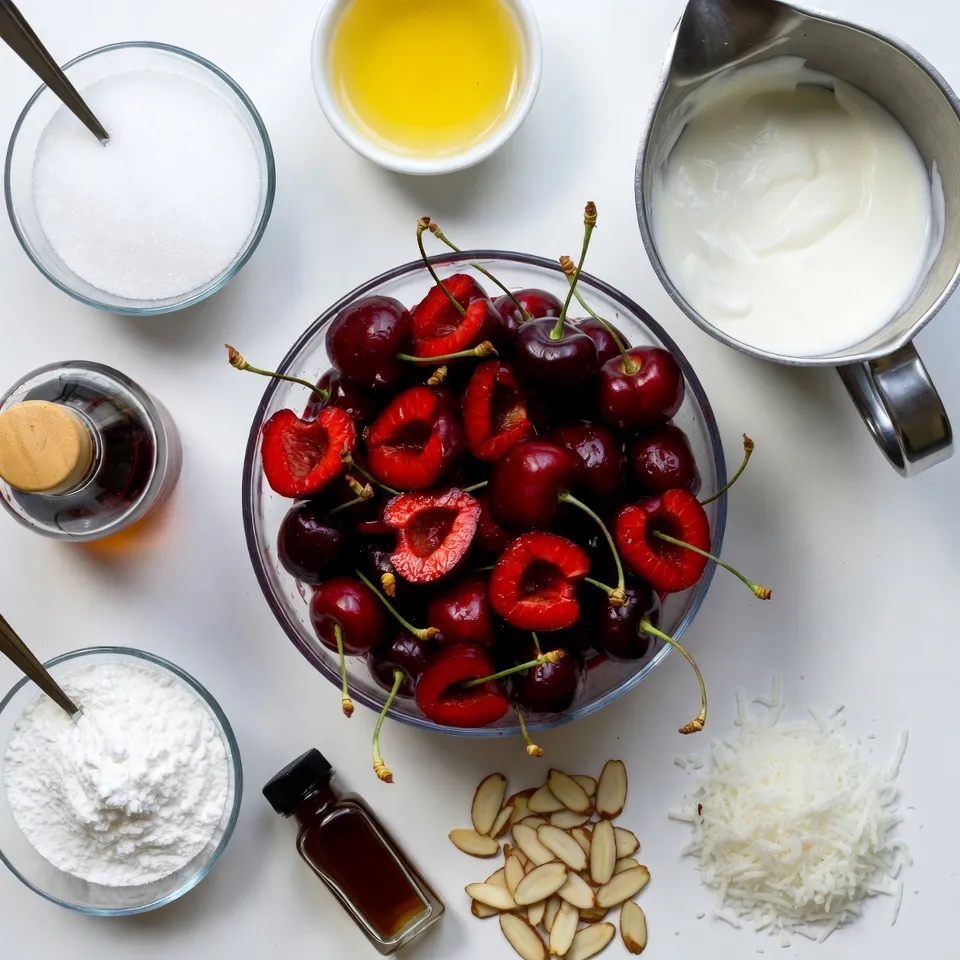
For this delightful treat, you’ll need:
– 2 cups cherries, pitted and halved (fresh or frozen)
– 1/2 cup granulated sugar
– 1 tablespoon lemon juice
– 1 teaspoon vanilla extract
– 1 cup heavy whipping cream
– 1/2 cup powdered sugar
– 1 teaspoon almond extract
These ingredients create the sweet and creamy layers that make this dessert shine. The cherries bring a bright flavor, while the cream adds a lovely richness.
Optional Garnishes
To make your dessert even more special, consider these garnishes:
– 1/4 cup slivered almonds, toasted
– Shredded coconut
These toppings not only add texture but also enhance the dessert’s visual appeal. The almonds give a nice crunch, and the coconut adds a tropical feel.
Ingredient Substitutions
If you want to change things up, there are easy swaps:
– Use other fruits like strawberries or blueberries instead of cherries.
– Swap heavy cream for coconut cream for a dairy-free option.
– Try using maple syrup instead of granulated sugar for a different sweetness.
These substitutions can keep the dessert fresh and fun, allowing you to make it your own!
Step-by-Step Instructions
Preparing the Cherry Mixture
To start, gather your cherries, sugar, lemon juice, and vanilla extract. In a medium saucepan, mix the cherries, sugar, lemon juice, and vanilla. Turn on the heat to medium. Stir the mixture gently. Cook it until the cherries soften and the mix gets syrupy, about 8 to 10 minutes. If you use frozen cherries, you may need a bit more time. Once done, take it off the heat and let it cool to room temperature.
Whipping the Cream
While the cherry mix cools, take a large bowl and add the heavy whipping cream. Use an electric mixer to whip it until you see soft peaks form. This takes about 3 minutes. Gradually add in the powdered sugar and almond extract. Keep whipping until you see stiff peaks. This means it is ready to be used.
Assembling the Dessert
Now, you can assemble your dessert. Grab clear glass cups or bowls. Start with a layer of the cherry mixture at the bottom. Then, add a layer of whipped cream on top. Repeat these layers until you use all the ingredients. Make sure the last layer is whipped cream. For a beautiful finish, add toasted slivered almonds and a sprinkle of shredded coconut on top. This gives it a lovely snowy look. Finally, chill the dessert in the fridge for at least one hour before serving.
Tips & Tricks
Achieving the Perfect Whipped Cream
To make great whipped cream, start with cold cream. Cold cream whips better and faster. Use a large bowl and a whisk or an electric mixer. Whip until soft peaks form, then add powdered sugar and almond extract. Continue until you see stiff peaks. Stiff peaks hold their shape and look nice in the dessert.
Best Practices for Cherry Cooking
When cooking cherries, always use fresh or frozen ones. If using frozen, cook them longer. Combine cherries, sugar, lemon juice, and vanilla in a pot. Cook over medium heat, stirring gently. This helps the cherries soften and form a syrup in about 8-10 minutes. Let the mixture cool before layering.
Portioning and Layering Techniques
For a pretty dessert, use clear glasses. Start with a layer of cherries, then whipped cream. Repeat until you reach the top. End with whipped cream for a snowy look. Garnish with toasted almonds and shredded coconut. This adds crunch and enhances the dessert’s charm.
Pro Tips
- Use Fresh Cherries: Fresh cherries will give the best flavor and texture. If using frozen, ensure they are fully thawed and drained before cooking.
- Whip Cream to Stiff Peaks: Make sure to whip the cream until it reaches stiff peaks for a stable and creamy layer that holds its shape.
- Chill Before Serving: Allowing the dessert to chill for at least an hour lets the flavors meld and improves the overall texture.
- Garnish for Presentation: Adding garnishes like toasted almonds and shredded coconut not only enhances flavor but also creates an appealing snowy look.
Variations
Using Different Fruits
You can swap cherries for other fruits. Try strawberries or raspberries for a twist. Both fruits add a bright color and taste. You can also use peaches or blueberries. Each fruit will bring its own unique flavor to the dessert. Just follow the same steps in the recipe for a delicious change.
Dairy-Free Alternatives
If you want a dairy-free version, use coconut cream. It whips up just like heavy cream. Make sure to chill it first for better results. You can also use almond milk or oat milk in place of the whipping cream. Just note that the texture may be a bit different, but still tasty!
Unique Flavor Additions
Add new flavors to your dessert for fun. A splash of orange juice can brighten the cherry mix. You can also try adding spices like cinnamon or nutmeg. For an extra kick, consider using flavored extracts. Peppermint or coconut extract can give a festive twist to the dish. The possibilities are endless, so feel free to get creative!
Storage Info
Refrigeration Tips
Store your Cherries in the Snow dessert in the fridge. Use an airtight container to keep it fresh. It helps to prevent the cream from absorbing other odors. This dessert is best enjoyed cold.
Freezing Instructions
You can freeze this dessert, but it might change texture. Layer it in a freezer-safe dish. Cover it tightly with plastic wrap and foil. Thaw in the fridge before serving for best results.
Duration of Freshness
In the fridge, this dessert lasts about 3 days. If you freeze it, aim to enjoy it within one month. After that, the flavors and texture may decline. Always check for any signs of spoilage before serving.
FAQs
Can I use frozen cherries for this recipe?
Yes, you can use frozen cherries. They work well and save time. Just remember to cook them a bit longer. This helps them heat through and get soft. The dessert will taste just as good!
How long does the dessert need to chill?
You should chill the dessert for at least one hour. This helps the layers set and taste better. If you have time, chilling for longer is even better. It gives the flavors a chance to blend.
What can I substitute for heavy whipping cream?
If you want a lighter option, you can use whipped topping. Another choice is full-fat coconut milk. Both give a nice texture. They may change the flavor a bit, but they work great!
Is it possible to make this dessert in advance?
Yes, you can make Cherries in the Snow ahead of time. Prepare it a day before serving. Just keep it in the fridge. This allows the flavors to meld together, making it even tastier!
Cherries in the Snow is a fun and tasty dessert. We explored the main ingredients, easy steps, and helpful tips. You can even try different fruits or dairy-free options. Remember to store it properly to keep it fresh. This dessert fits any occasion and is simple to customize. Try making it your own, and enjoy sharing it with others. You now have all the tools to impress your friends and famil