Are you ready to elevate your baking game with glossy royal icing? This simple guide covers easy techniques to help you master this shiny, sweet staple. I’ll walk you through the essential ingredients, step-by-step instructions, and expert tips. Whether you aim to create beautiful cookies or impressive cakes, perfect royal icing makes all the difference. Let’s dive in and make your treats shine!
Why I Love This Recipe
- Versatile: This royal icing can be used for various decorations, from cookies to cakes, making it a go-to choice for any dessert.
- Easy to Make: With just a few ingredients and simple steps, this recipe is perfect for both beginners and experienced bakers.
- Glossy Finish: The glossy texture adds a professional touch to any baked goods, enhancing their visual appeal.
- Customizable: With options to add flavors and colors, you can easily tailor the icing to match your theme or preference.
Ingredients
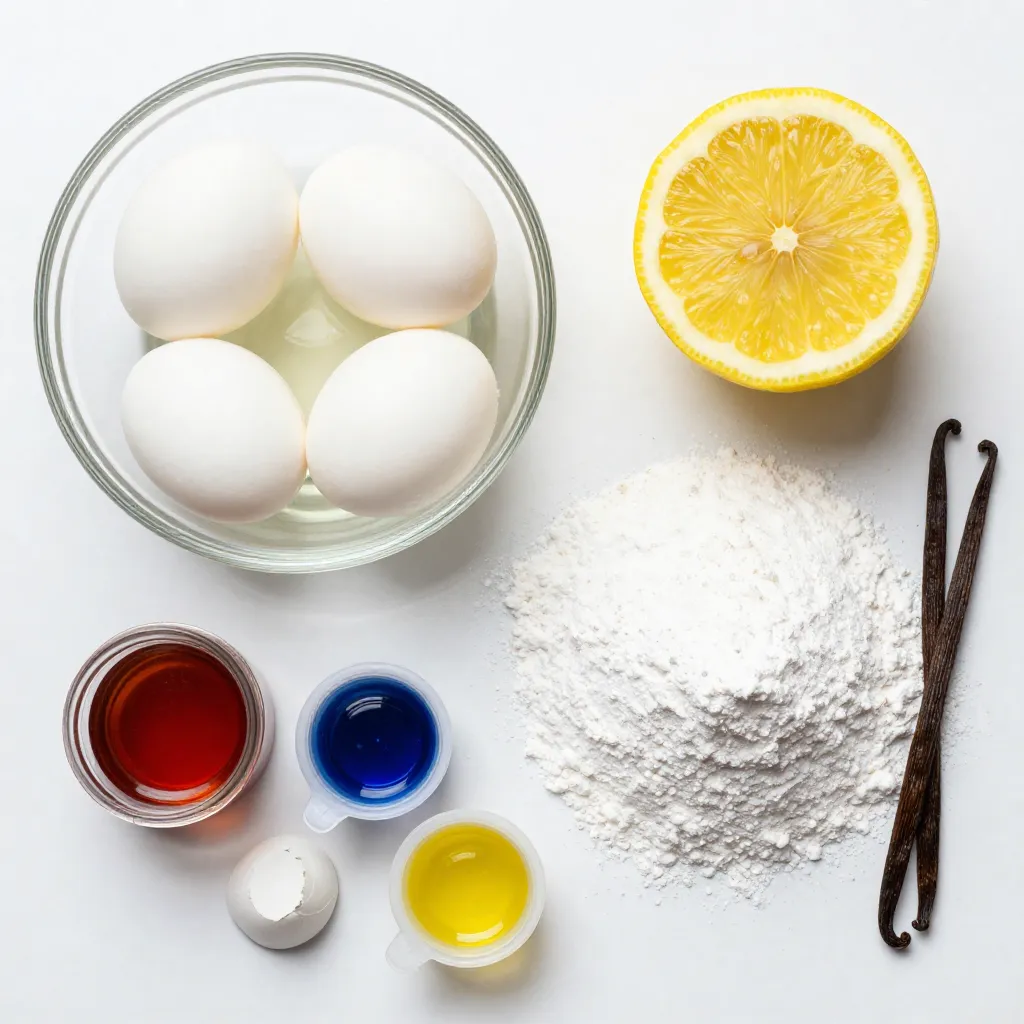
To make glossy royal icing, gather these simple ingredients:
– 4 large egg whites or 1/2 cup pasteurized egg whites
– 1 teaspoon lemon juice
– 4 cups powdered sugar (sifted)
– 1/2 teaspoon vanilla extract (optional)
– Food coloring (optional)
These ingredients are key to creating that perfect glossy finish. You can use fresh egg whites or pasteurized ones for safety. Lemon juice adds a nice tang and helps stabilize the icing. Always sift the powdered sugar to avoid lumps. This ensures a smooth and easy mix. The vanilla extract is for flavor but is not a must. Food coloring lets you add a personal touch to your designs.
Having these ready makes your icing process smooth and quick. Keep everything measured out for a hassle-free experience. With these ingredients, you are set to create beautiful decorations for your baked goods.
Step-by-Step Instructions
Mixing the Egg Whites and Lemon Juice
To start, take a large mixing bowl. Add the egg whites and lemon juice. Whisk them together until they are well mixed. Use a hand mixer or a whisk. If you use a mixer, start slow. This helps avoid splashing. Whisk for about one minute. You want a smooth and frothy mix. The lemon juice helps the icing set and adds a nice flavor.
Adding Powdered Sugar
Next, it’s time to add powdered sugar. Take your sifted sugar and add it one cup at a time. Use a low mixer speed to mix it in. This keeps a sugar cloud from forming. Keep mixing until all the sugar is added. This step is crucial for a smooth icing. If you rush, you may end up with lumps.
Achieving Glossy Consistency
After all the sugar is mixed in, increase the speed to medium. Beat the icing for about 4 to 5 minutes. You want it to be glossy and smooth. Look for a thick yet pourable texture. It should hold its shape when piped. If it’s too thick, add a few drops of water to thin it. For perfect results, test the icing by piping it. It should flow easily but still keep its design.
Tips & Tricks
Color Adding Techniques
To add color to your royal icing, use gel food coloring. Gel colors mix well and keep icing thick. Start by adding one drop. Mix well and check the shade. If you want a deeper color, add more drops. Avoid using too much liquid coloring. It can change the icing’s texture.
To mix colors evenly, use a small spatula. This helps spread the color throughout the icing. Fold it gently. Don’t stir too hard, or you may create air bubbles. For a marbled look, swirl the color in lightly instead of mixing completely.
Achieving the Right Consistency
The right consistency is key for glossy royal icing. For thick icing, aim for a texture like toothpaste. It holds shapes well for piping. If you need thinner icing for flooding, add water. Start with just a few drops. Mix it in and check the flow. It should run smoothly but still hold its shape.
Use a timer when mixing. For thick icing, mix for about 4-5 minutes. For thinner icing, you may need less time. Always test with a spoon. If it drips off quickly, it’s ready for flooding!
Presentation Ideas
Piping bags help you create detailed designs. Use different tips for various effects. A round tip works well for outlines. A star tip can make beautiful flowers. Fill your piping bag with your icing and pipe onto cookies or cakes.
To make your designs pop, consider adding edible glitter. It adds a fun sparkle to your decorations. Wait until your icing is dry before adding glitter, so it sticks well. Using these techniques, you can make your treats look professional and very tasty!
Pro Tips
- Use Room Temperature Egg Whites: Egg whites whip better when they are at room temperature, resulting in a fluffier and more stable royal icing.
- Consistency is Key: Adjust the consistency of your icing by adding water or powdered sugar incrementally until you achieve the desired thickness for your decorating needs.
- Work Quickly: Royal icing dries quickly, so make sure to pipe your designs promptly and keep any unused icing covered to prevent it from hardening.
- Coloring Caution: When adding food coloring, start with a small amount and gradually increase to avoid over-saturating the icing, which can affect its consistency.
Variations
Flavored Royal Icing
You can add extracts to your royal icing for fun flavors. Common choices include vanilla, almond, and lemon. Just use about a half teaspoon for a nice touch. This small amount gives your icing a delightful twist without overpowering it.
Pair these flavors with your baked goods. Vanilla icing goes great on sugar cookies. Almond flavor can be perfect for cakes. Lemon icing brightens up gingerbread cookies. Experiment to find your favorite combinations.
Seasonal and Holiday Variations
Use colors to match the season or holiday. For Christmas, think red and green. For Halloween, try orange and black. You can mix and match food colors to create fun designs.
Consider themed decorating tips for special occasions. For Valentine’s Day, use pink and white with heart shapes. For Easter, pastel colors and floral patterns shine. These small touches make your treats stand out.
Vegan Alternatives
If you want a vegan version, replace egg whites with aquafaba. Aquafaba is the liquid from canned chickpeas. Use about 3 tablespoons of aquafaba to replace one egg white. This swap keeps your icing smooth and glossy.
You can also use powdered egg replacers. Mix according to package instructions and whip it well. Both options give you a similar texture in your royal icing. Enjoy your vegan treats without losing that perfect finish.
Storage Info
Best Practices for Storing Royal Icing
To keep your glossy royal icing fresh, use an airtight container. This prevents air from getting in and drying out your icing. Store it at room temperature. If you need to keep it for more than a few days, you can place it in the fridge. However, always allow it to reach room temperature before using it again. Proper storage helps maintain its lovely shine and smooth texture.
Reviving Dried Royal Icing
If your royal icing dries out, don’t worry. You can bring it back to life! Just add a few drops of water. Mix it gently until it reaches the right consistency. If the icing smells off or has changed color, it’s best to toss it. Fresh icing works best for decorating.
Avoiding Common Storage Issues
To prevent your royal icing from hardening, cover it tightly with plastic wrap before sealing the container. Make sure the wrap touches the icing to block air. If you want to keep the glossy finish, avoid exposing it to moisture or extreme heat. Following these tips will help you enjoy your icing’s beauty and taste every time.
FAQs
What is glossy royal icing used for?
Glossy royal icing is perfect for decorating cookies and cakes. It sets hard, which helps hold shapes. Use it to create smooth, shiny finishes on your treats. You can also use it for intricate designs and even piping details. The glossy look adds a professional touch to any dessert.
How long does glossy royal icing last?
When stored properly, glossy royal icing can last for about two weeks. Keep it in an airtight container at room temperature. If you see any signs of drying or hardening, it’s best to discard it. Always check for freshness before using.
Can I make royal icing ahead of time?
Yes, you can make royal icing ahead of time. Just store it in an airtight container. Make sure to press plastic wrap directly onto the icing to prevent it from drying out. Before using it, give it a quick stir to restore its texture.
What should I do if the icing doesn’t become glossy?
If your icing doesn’t become glossy, check your mixing time. You may need to beat it longer. Make sure you added enough powdered sugar as well. A lack of sugar can lead to a dull finish. If it’s too thick, add a few drops of water to improve consistency.
Is royal icing safe to eat if made with raw egg whites?
Using raw egg whites can pose a risk of salmonella. To make it safer, use pasteurized egg whites instead. They provide the same results without the health risks. You can also find vegan options that mimic the texture of royal icing without eggs.
You now know how to make royal icing, from ingredients to storage.
By mixing egg whites, lemon juice, and sugar, you create a glossy finish. You also learned tips for adding color and making variations, like vegan options. Remember to store your icing correctly to maintain its quality.
Use these tips to impress with your baking. Enjoy crafting beautiful treat