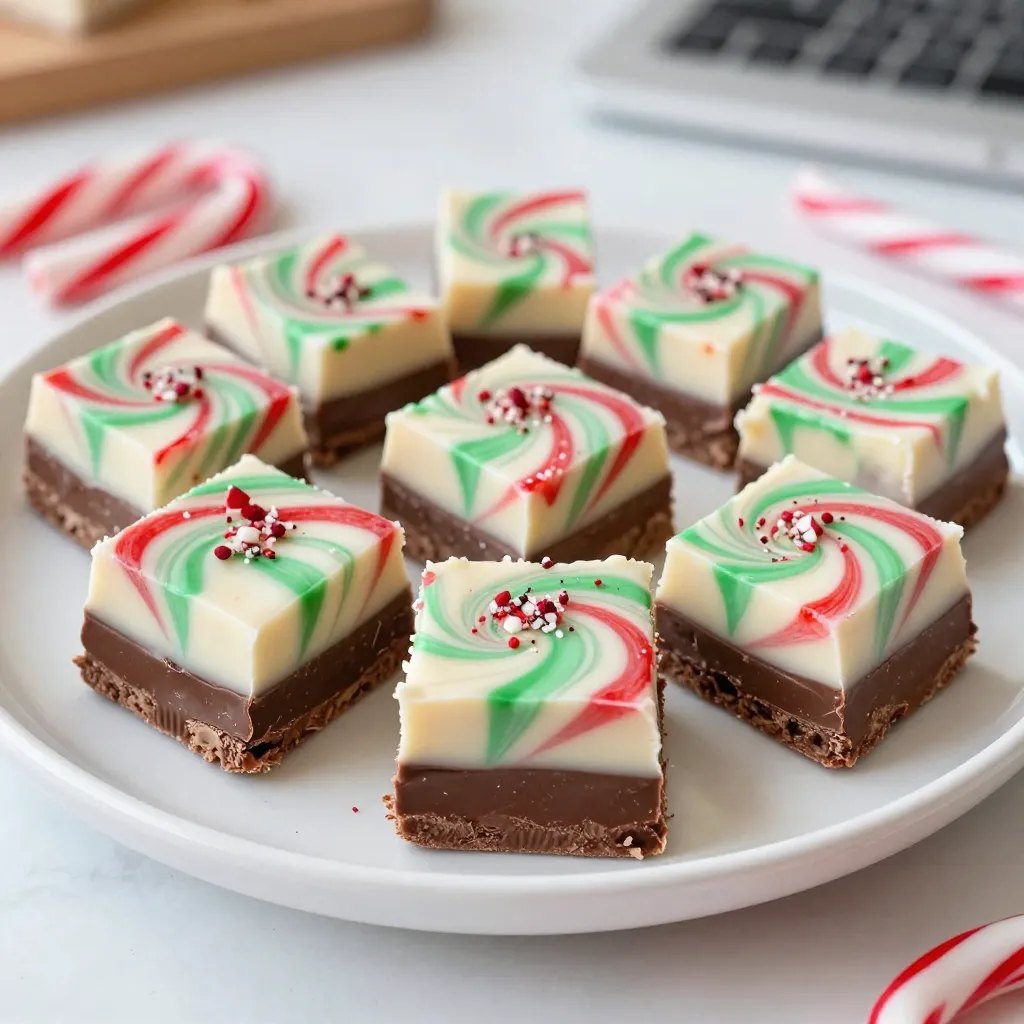
Get ready to elevate your holiday treats with my Peppermint Swirl Fudge! This festive delight combines rich chocolate with a burst of peppermint, making it a crowd-pleaser. With just a few simple ingredients, you can whip up this colorful, creamy fudge that’s perfect for sharing—or keeping all to yourself! Join me as I guide you through each step to create this sweet masterpiece that will impress everyone at your holiday gatherings.
Why I Love This Recipe
- Festive Flavor: This fudge combines the rich taste of chocolate with refreshing peppermint, making it a perfect treat for the holiday season.
- Visual Appeal: The vibrant red and green swirls create a stunning marbled effect, making it an eye-catching dessert for any gathering.
- Easy to Make: With just a few simple ingredients and straightforward steps, this recipe is perfect for bakers of all skill levels.
- Great for Gifts: Packaged in festive boxes, this fudge makes a delightful homemade gift for friends and family during the holidays.
Ingredients
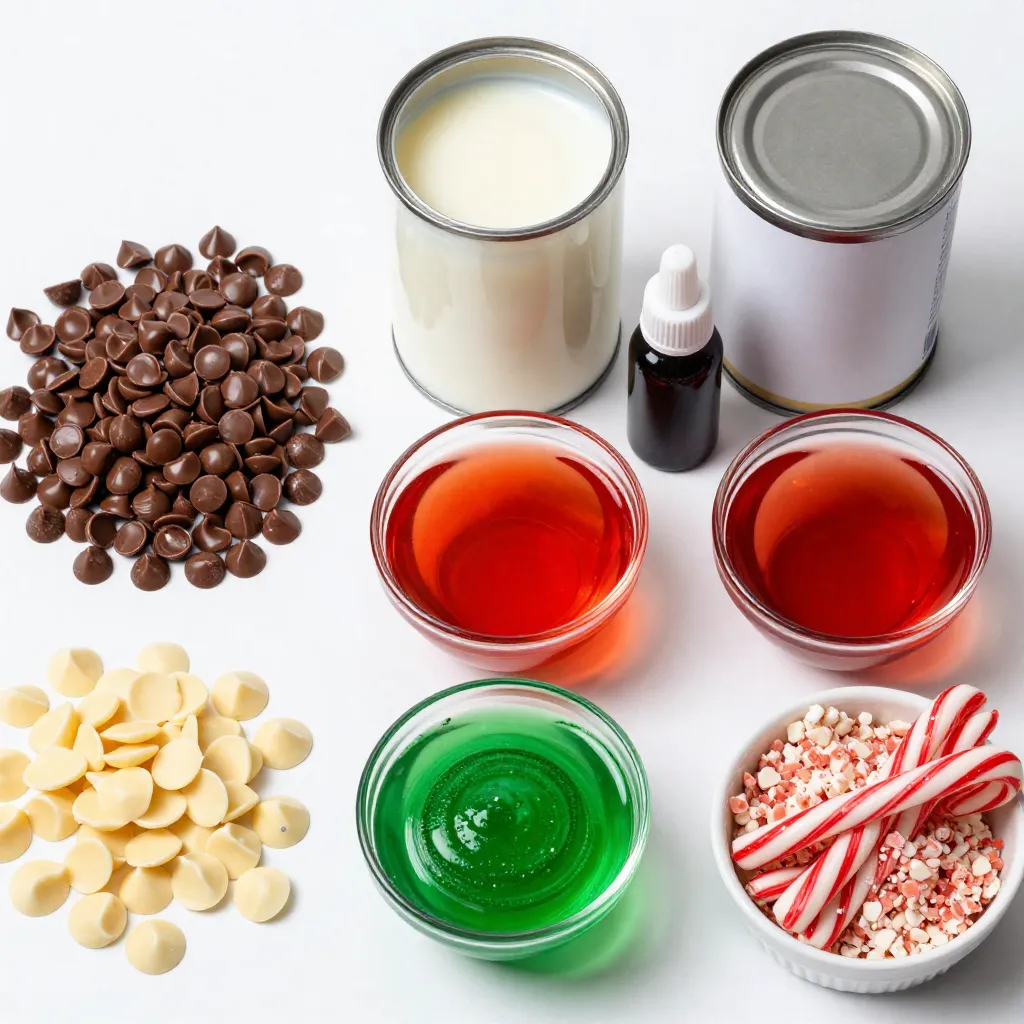
List of Ingredients
– 2 cups semi-sweet chocolate chips
– 1 cup white chocolate chips
– 1 can (14 oz) sweetened condensed milk
– 1 teaspoon peppermint extract
– 1/2 teaspoon red food coloring
– 1/2 teaspoon green food coloring
– Crushed candy canes for topping
Recommended Brands
When choosing chocolate chips, I suggest brands like Ghirardelli or Nestlé. They melt smoothly and taste great. For sweetened condensed milk, Eagle Brand is a reliable option. It adds the perfect creaminess to the fudge.
Ingredient Substitutes
If you need alternatives, here are some ideas:
– Use dark chocolate chips instead of semi-sweet for a richer flavor.
– Swap white chocolate chips with carob chips for a different twist.
– If you’re out of condensed milk, you can make your own by simmering milk and sugar together.
These substitutes can still give you that festive fudge taste, while allowing you to work with what you have at home.
Step-by-Step Instructions
Preparing the Baking Dish
Start by preparing your baking dish. Use an 8×8 inch dish for the best fit. Line the dish with parchment paper. Make sure to leave some paper hanging over the edges. This will help you lift the fudge out easily later. A quick tip: use a little cooking spray on the dish before adding the paper. This helps it stick better.
Melting the Semi-Sweet Chocolate
Next, it’s time to melt the semi-sweet chocolate. In a medium saucepan, mix 2 cups of semi-sweet chocolate chips with half of the sweetened condensed milk. Heat this over low heat. Stir it often to avoid burning. You want it smooth and glossy. Once melted, remove it from the heat. Now, add 1 teaspoon of peppermint extract. This gives a nice minty flavor.
Making the White Chocolate Layer
Now, let’s make the white chocolate layer. In another saucepan, combine 1 cup of white chocolate chips with the rest of the sweetened condensed milk. Heat this on low, stirring until smooth. Once it’s ready, divide this mixture into two bowls. In one bowl, add 1/2 teaspoon of red food coloring. In the other, add 1/2 teaspoon of green food coloring. Mix until the colors are even.
To create that beautiful marbled effect, pour dollops of both colored mixtures over the semi-sweet chocolate layer. Use a toothpick or a butter knife to swirl the colors together gently. Be careful not to mix too much; you want to see both colors. Finally, sprinkle crushed candy canes on top for a festive touch.
Tips & Tricks
Best Practices for Fudge Making
To make great fudge, you need to control the heat. Use low heat when melting chocolate. High heat can burn the chocolate. If the chocolate gets too hot, it can become grainy. Stir the mixture often to keep it smooth.
Another tip is to watch the temperature closely. For best results, the fudge should cool at room temperature. Avoid putting it in the fridge while still warm. This can cause a rough texture.
Creative Serving Suggestions
When serving your fudge, make it look special. Place the fudge squares on a nice platter. You can also use gift boxes for a fun touch. Add crushed candy canes on top for color. Mini candy canes make a cute garnish too.
Pair your fudge with hot cocoa or coffee. The rich flavors complement each other well. You can also serve it with ice cream for a delicious treat.
Common Mistakes to Avoid
One mistake is not lining the baking dish. If you skip this step, the fudge will stick. Make sure you leave some parchment overhang for easy removal.
Another common mistake is cutting fudge too soon. Wait until it is fully set. If you cut it too early, it may fall apart. Patience is key for perfect fudge!
Pro Tips
- Use High-Quality Chocolate: The better the chocolate, the richer and more delicious your fudge will taste. Opt for premium brands for the best results.
- Cool Slowly: Let the fudge cool at room temperature before refrigerating. This helps prevent condensation and ensures a smoother texture.
- Swirl Technique: When swirling the colored white chocolate, be gentle to avoid mixing too much. You want to create distinct swirls for a beautiful presentation.
- Storage Tips: Store your fudge in an airtight container in the refrigerator for up to two weeks. For longer storage, you can freeze it, just make sure to wrap it well.
Variations
Alternative Flavorings
You can add different flavors to your fudge. Vanilla or almond extract can enhance the taste. Just replace half of the peppermint extract with these flavors. This change creates a new twist on the classic fudge. You can also try mixing in other extracts. Experimenting with flavors keeps things fun and tasty.
Dietary Modifications
If you need gluten-free or vegan options, you can make some simple swaps. Use gluten-free chocolate chips for a gluten-free version. For vegan fudge, choose dairy-free chocolate and use coconut milk instead of sweetened condensed milk. These changes make fudge fit for everyone to enjoy without worry.
Color Variations
Seasonal color combinations can make your fudge stand out. Use different food coloring to match holidays or themes. Try orange and black for Halloween or blue and white for winter. This creativity adds a fun visual to your treats. You can even layer the colors in fun shapes for a festive look.
Storage Info
How to Store Peppermint Swirl Fudge
To keep your peppermint swirl fudge fresh, store it in an airtight container. Make sure it is completely cooled before you cover it. You can place parchment paper between layers of fudge if you stack them. This step helps prevent sticking. The ideal storage temperature is in a cool, dry place away from heat and sunlight.
The shelf life of this fudge is about two weeks at room temperature. If you want it to last longer, refrigeration can extend its life to about three weeks. Just remember that chilling can change its texture slightly, making it a bit firmer.
Freezing Instructions
To freeze your fudge, first cut it into squares. Wrap each piece in plastic wrap, then place them in a freezer-safe bag. This method helps keep them fresh and protects against freezer burn.
You can freeze peppermint swirl fudge for up to three months. When you’re ready to enjoy it, remove the fudge from the freezer and let it thaw in the fridge. This process takes a few hours but keeps it from getting too soft too fast.
Using Leftover Fudge
If you have leftover fudge, there are many fun ways to use it. You can chop it into small pieces and mix it into ice cream for a minty treat. Or, melt some fudge and drizzle it over hot chocolate or pancakes. You can even use it to make a unique dessert topping for cakes or brownies. This way, no fudge goes to waste, and you can add a festive touch to other treats!
FAQs
How long does it take for fudge to set?
Fudge takes about three hours to set in the fridge. This time helps the fudge firm up nicely. I recommend checking it after three hours. If it feels firm to the touch, it’s ready. If not, let it chill longer.
Can I use different types of chocolate?
Yes, you can use other chocolates! Dark chocolate or milk chocolate works great. Each type adds its own flavor. So, feel free to mix and match. Just remember to adjust the sweetness if needed.
What’s the best way to cut fudge into squares?
To cut fudge, first, let it chill completely. Use a sharp knife for clean cuts. I like to warm the knife slightly. This helps it glide through the fudge. Start by cutting the fudge into strips, then cut those into squares. Enjoy the neat shapes!
In this blog post, we discussed the delightful process of making peppermint swirl fudge. You learned the ingredients needed, tips for perfect texture, and creative serving ideas. Remember to control temperatures to avoid graininess and explore fun variations.
Fudge is a treat that brings joy during the holidays. With this guide, you can impress friends and family with tasty, colorful squares. So, get in the kitchen, have fun, and enjoy sharing your delicious fudge creation